Mysql Basics
Database administration is a great skill to have on the side where it allows you to store a bevy amount of data on a computer using structured query language. If you are familiar with web development, then you are most likely aware of how critical this service is.
Different type of databases
There are many databases that you could choose from on the internet such as postgresql, mongodb, m3d, sqlite, redis and many others but what separates them all is the type of database it is. You have Object oriented, Graph, NoSQL (non-relational), Relational and Hierarchical databases.
You could see on this page a list of the most popular databases. A lot of them are used for specific usages so you need to know which kind of database is required for your project. In this tutorial we will be focusing on relational database Mysql, which is also similar to SQLite and pretty much the same as MariaDB.
Getting the database installed
Assuming you are on a Debian based machine and have already updated and upgraded packages, you will use the following commands:
sudo apt install -y mariadb-server mariadb-clientI haven't tried it yet, but I believe if you are on CentOS, AlmaLinux and the like, you could use:
sudo yum install -y mariadb-server mariadb-clientNow that we have the database software installed, we'll need to now start and enable then configure it. You could go right ahead and dive into the configuration files if you'd like but I prefer setting it up for the first time via the interactive screen. Run:
                                            sudo systemctl start mariadb
                                            sudo systemctl enable mariadb
                                            sudo mysql_secure_installation
You should be greeted by the following questions which you answer with either y or n.
Enter current password for root (enter for none):
Switch to unix_socket authentication [Y/n]
Change the root password? [Y/n]
.....
Remove anonymous users? [Y/n]
....
Disallow root login remotely? [Y/n]
.....
Remove test database and access to it? [Y/n]
.....
Reload privilege tables now? [Y/n]
....
For most of the options you'll input y but I will like to explain each choices so that you have an idea what is happening in the backend.
Enter current password for root (enter for none):
As we are configuring the database for the first time, we don't have a current root password. Keep in mind that this login is not the same as your ssh root login credentials. This option you should just hit enter.
Switch to unix_socket authentication [Y/n]
As it mentions in the official documentation of MariaDB here:
"The unix_socket authentication plugin allows the user to use operating system credentials when connecting to MariaDB via the local Unix socket file. This Unix socket file is defined by the socket system variable."
Because this will allow us to have remote users connect to the database server that may have an account saved here, we'll hit yes.
Change the root password? [Y/n]
At this point, we will be now creating a password for the root user of the database. After you hit yes, you will be prompted to enter your new password then confirm it.
Remove anonymous users? [Y/n]
We want to make our database server as secure as possible, therefore we want to hit yes. By hitting no, you are basically opening yourself up to anyone connecting to the database without a user accpimt created and associated to a (several or all) databases.
Disallow root login remotely? [Y/n]
In case the user that is using the root user is compromised and their password is discovered, hitting yes will prevent hijackers from login in to the database outside of the database server and potentially causing havoc or data harvesting.
Remove test database and access to it? [Y/n]
For security reasons, data management and saving some space, we want to hit yes.
Reload privilege tables now? [Y/n]
Reloading privileges will flush any in-memory copy of rules and grabs an update from any statement done through SQL using INSERT, UPDATE OR DELETE commands. According to the official documentation, any Account Management Statements (GRANT, REVOKE, SET PASSWORD AND RENAME USER) are immediately loaded into memory. Just to be safe, after this interactible, we will hit yes.

We now begin
From here default port 3306 will be opened for communication on the database server. We will begin by logging in to start setting up our users, passwords, databases and access.
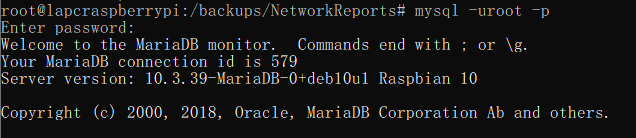
sudo mysql -uroot -pYou will be prompted to enter your password which you just configured to login. If you are successful, you will get a welcome to MariaDB banner, with the connection id.
MySQL statements always ends with ; and the commands are not case sensitive. The lines below will create a database, create a user locally with a password then assign privileges and access to the created user to the database we just made. Just to create a good habit, we will flush the privileges then exit.
CREATE DATABASE firstdatabase;

CREATE USER 'db_user'@'localhost' IDENTIFIED by 'password' ;

GRANT ALL ON firstdatabase.* TO 'db_user'@'localhost' WITH GRANT OPTION;

FLUSH PRIVILEGES;

EXIT;
Just doing the above is enough to get a working database named firstdatabase, assigned to db_user with a password of password and it has enough privileges to alter and make modifications to the database and all within. While using the software application that will connect to the database, tables and many other information will start to populate. Congratulations, you've got a working database!
Lastly the user db_user exists locally on the MariaDB/MYSQL server but if we wanted the user to be accessible from another instance/node, meaning your users will initiate a connection to this database server from another instance/node, you'll change localhost variable to the ip address to said node/instance on lines 2 and 3. You'll want to test the connection by issuing the following(change the variables to what you will be using):
mysql -udb_user -p -hDataBaseServerIP firstdatabaseYou'll be asked to input a password if successful.
Management of the server
Great thing about most database servers, they are already pre-programmed in the background to do cleanups and compressing.
Now at times we'll want to manually or maybe even automate a MYSQL database dump so that we can have a copy at a remote location to maybe launch a new database server with said dump or even just hold onto fresh copies for review. To successfully dump a database, we'll use the following:
mysqldump -udb_user -pTypePasswordHere firstdatabase > /path/to/firstdatbase.sqlThe above won't delete the existing the database, it is only making a copy. Now if we wanted to import or restore the database we could use :
mysql -udb_user -pTypePasswordHere < /path/to/firstdatabase.sqlNow that we have a dumped database .sql file, we can transfer it like any other file to another database host. There are many strategies to successfully restore it to another instance, if over the same network. You could use:
mysqldump --all-databases -udb_user -pTypePasswordHere | mysql -hDataBaseServerIP -udb_remoteuser -pRemoteServerPasswordHere The above will dump all databases from the server. You could omit --all-databases to the name of the database you want instead.
If a database is very large, especially in the GB, the above may not always be the best solution. Especially if the connection breaks, then you'll need to redo it from the beginning. There are several strategies but I will share a quick one that I've tried in the past.
# Stop the source MariaDB/MySQL server processes.
# Copy contents from the datadir to another location on the local disk. Usually found in /var/lib/mysql
# Compress using tar, gzip, 7zip etc and SFTP it over to the other database server.

#Install MariaDB/MySQL on other server but don't start it yet.
#Unzip the compressed backup and move all the contents to the new datadir.
#Start MariaDB/MySQL processes.
Changing the default listening TCP port
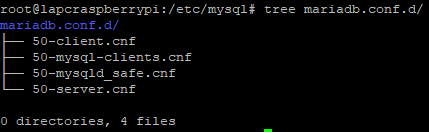
It's actually very easy. We'll need to find 50-server.cnf file which should be by default in the /etc/mysql/mariadb.conf.d directory.

You'll just now need to change the default port 3306 to another that is not occupied or reserved, then reload the daemon like so systemctl restart mariadb. The new TCP listening port will be active.
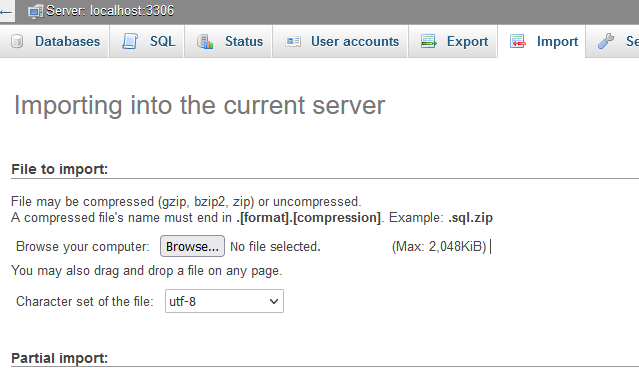
Using PHPMyAdmin
We won't go over how to install it right now, but only how to import. Once you've logged in, you'll need to create a new database using a user that has root like privileges within MySQL or none of this will work.